


In our step-by-step guide, “How to Connect and Wire Solar Panels in an Off-grid Battery System,” we provide you with the knowledge and instructions you need to successfully set up and wire solar panels in an off-grid battery system.
The purpose of this how-to guide is to assist those who are interested in harnessing solar power to create an efficient and sustainable off-grid battery system. We understand that not everyone is familiar with the process involved in connecting and wiring solar panels, so we aim to provide clear and empathetic instructions that will help you navigate through the steps with ease.
By the end of our guide, you will have a comprehensive understanding of how to properly connect and wire solar panels in an off-grid battery system, enabling you to take advantage of the abundant solar energy available and power your off-grid lifestyle. Whether you are looking to reduce reliance on traditional energy sources or simply want to embrace a greener and more sustainable way of living, we are here to help you every step of the way.
Top-rated solar battery systems for off-grid living


Step 1: Assess your power needs
To determine the amount of power you need to generate and store in your off-grid battery system, first, assess the appliances you’ll be running. Make a list of all the devices, such as lights, refrigerator, television, or laptop, and note their power consumption in watts. Next, calculate the total daily electricity consumption by multiplying the power consumption of each appliance by the number of hours you anticipate using them. Finally, add up all these values to get an estimate of the total power needed for your off-grid battery system.
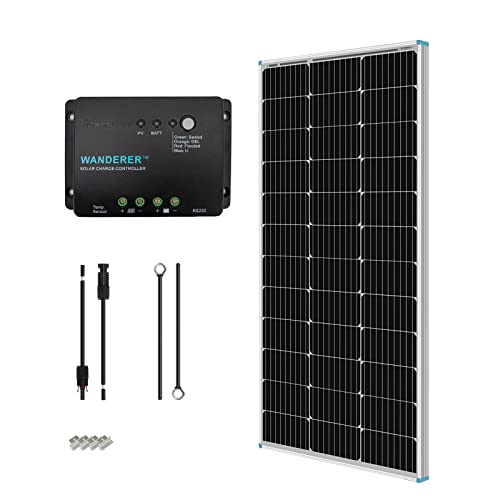
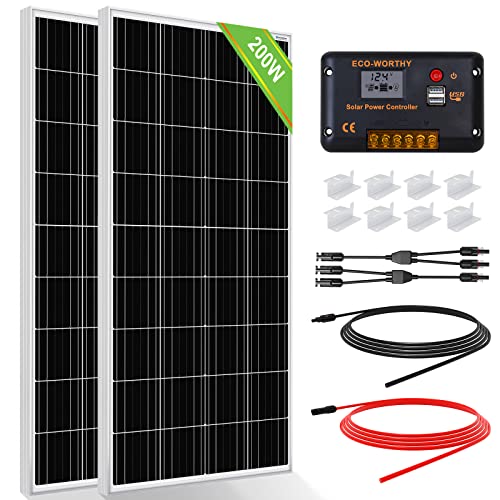

Step 2: Choose the right solar panels
To successfully choose the right solar panels for your needs, follow these steps:
- Assess Your Power Needs: Determine the amount of electricity you require by analyzing your average daily power consumption. This will help you select solar panels that can generate enough energy to meet your needs.Example: If your daily power consumption is around 20 kWh, you will need solar panels with a wattage capacity that exceeds this amount.
- Consider Wattage, Efficiency, and Durability: Look for solar panels with higher wattage ratings, as they will generate more power. Additionally, consider the efficiency of the panels, which indicates how effectively they convert sunlight into electricity. Higher efficiency panels will produce more electricity for the same amount of sunlight. Lastly, choose panels that are durable and able to withstand various weather conditions.Example: A solar panel with a wattage rating of 300W and an efficiency of 20% will generate more electricity than a panel with a wattage rating of 200W and an efficiency of 15%.
- Ensure Compatibility with Your Battery System: If you plan to use a battery system to store excess energy, make sure the solar panels you choose are compatible with your specific battery system. Check the manufacturer’s specifications and recommendations for compatibility.Example: If you have a lithium-ion battery system, ensure that the solar panels you select are compatible with this type of battery technology.
Remember, selecting the right solar panels is crucial for maximizing your energy generation and ensuring the long-term reliability of your solar power system.
Step 3: Determine the optimal location for the solar panels
To determine the optimal location for your solar panels, follow these steps:
- Find a location with maximum sunlight exposure: Look for an area that is not shaded by tall trees, buildings, or any other structure. Remember that the panels should be exposed to sunlight throughout the day, so take into consideration the path of the sun in different seasons.
- Conduct a shading analysis: Before installing the panels, perform a shading analysis to identify potential obstructions. Use tools like a solar pathfinder or a smartphone app that can simulate shading patterns at different times of the day. This will help you determine if there are any objects that could cast shadows on the panels and compromise their efficiency.
- Consider the orientation: Ideally, the solar panels should face south (in the northern hemisphere) or north (in the southern hemisphere) to maximize sunlight absorption. If that’s not possible, east or west-facing panels can still generate significant electricity, but their output may be slightly reduced.
- Assess the tilt angle: The tilt angle of the panels should be adjusted to optimize sunlight absorption. In most cases, the optimal angle is equal to the latitude of your location. However, depending on your specific energy needs and geographical factors, you may choose to adjust the angle for better performance.
By following these steps and ensuring maximum sunlight exposure without obstructions, you can determine the optimal location for your solar panels and maximize their energy production.


Step 4: Mount the solar panels
To mount the solar panels, first, install the mounting hardware. Use the hardware provided by the manufacturer and make sure it is securely fixed to the roof or the ground. For a roof installation, attach the mounting brackets to the roof beams, ensuring they are properly aligned and spaced as instructed.
For example, if you have metal roofing, use a specialized bracket specifically designed for that type of roofing material. This will ensure a secure attachment while maintaining the integrity of your roof.
Next, attach the solar panels to the mounting brackets. Align the panels correctly according to the manufacturer’s instructions and securely fasten them using the provided hardware.
Consider factors like wind resistance by using additional brackets or securing bolts if necessary. Ensure that the panels are tilted at the optimal angle for your location to maximize sunlight exposure. The manufacturer’s instructions will specify the recommended tilt angle based on your latitude.
For example, if you live in an area with strong winds, you may need to use additional brackets to reinforce the panels. This will prevent them from being dislodged during heavy gusts. Additionally, if you are located in a region with a higher latitude, a steeper tilt angle may be required to capture more sunlight in areas with shorter days.
Remember to carefully follow the manufacturer’s instructions throughout the installation process. If you encounter any difficulties or uncertainties, consult a professional to ensure a safe and efficient installation.
Step 5: Connect the solar panels in series or parallel
- Decide – Determine whether to connect the solar panels in series or parallel based on your system voltage and desired output.
- Check – Consult the wiring diagram provided by the manufacturer to ensure you have the correct information to proceed.
- If series – Connect the positive terminal of one solar panel to the negative terminal of the next panel, and continue until all panels are connected. Connect the positive terminal of the first panel to the positive terminal of your charge controller and the negative terminal of the last panel to the negative terminal of the charge controller.
- If parallel – Connect all the positive terminals of the solar panels together and all the negative terminals together. Connect the positive and negative terminals to the corresponding terminals on the charge controller.
- Verify – Double-check all connections to guarantee they are secure and properly wired.
- Test – After completing the connections, test the system to ensure the solar panels are functioning effectively and providing the desired output.
Remember, following the manufacturer’s instructions and consulting a professional electrician if needed will help ensure a safe and efficient solar panel installation.


Step 6: Connect the solar panels to a charge controller
To connect the solar panels to a charge controller, begin by locating the positive and negative terminals on the solar panels. Then, identify the appropriate input terminals on the charge controller. Next, connect the positive terminal of the solar panel to the positive input terminal of the charge controller, and the negative terminal of the solar panel to the negative input terminal of the charge controller. It is crucial to ensure proper polarity, meaning the positive terminal is connected to the positive input terminal and the negative terminal is connected to the negative input terminal. Additionally, it is important to carefully follow the instructions provided by the manufacturer for your specific charge controller model. For instance, if your charge controller has multiple input terminals, make sure you connect the solar panels to the correct terminals designated for them.
Step 7: Connect the charge controller to the battery bank
Connect the output terminals of the charge controller to the positive and negative terminals of the battery bank. Ensure that the polarity is correct by connecting the positive terminal of the charge controller to the positive terminal of the battery bank, and the negative terminal of the charge controller to the negative terminal of the battery bank. Follow the manufacturer’s instructions for the specific model of charge controller you are using.
For example, if the positive terminal of the charge controller is labeled “+” and the positive terminal of the battery bank is labeled “+,” connect the two terminals together. Similarly, if the negative terminal of the charge controller is labeled “-” and the negative terminal of the battery bank is labeled “-“, connect them together. Ensure that the connections are securely fastened to avoid any loose connections that may cause issues with the charging process.
Always refer to the manufacturer’s instructions for any additional guidance and specific details, as different models of charge controllers may have slight variations in their installation processes.
Step 8: Connect the battery bank to the inverter
To connect the battery bank to the inverter, follow these steps:
- Locate the positive terminal on the battery bank. It is usually labeled with a “+” symbol or the word “positive.”
- Connect the positive terminal of the battery bank to the appropriate input terminal of the inverter. Ensure that the polarity is correct by matching the positive terminal of the battery to the positive input terminal of the inverter.
- Example: Connect the red cable (positive) from the battery bank to the red terminal of the inverter.
- Hint: Some inverters may have color-coded terminals for ease of connection.
- Locate the negative terminal on the battery bank. It is often labeled with a “-” symbol or the word “negative.”
- Connect the negative terminal of the battery bank to the appropriate input terminal of the inverter. Again, ensure proper polarity by matching the negative terminal of the battery to the negative input terminal of the inverter.
- Example: Connect the black cable (negative) from the battery bank to the black terminal of the inverter.
- Securely fasten the connections, ensuring that they are tight and will not come loose.
- Before proceeding, refer to the manufacturer’s instructions to ensure you have followed any specific requirements or recommendations for your particular inverter model.
By following these instructions and observing correct polarity, you will successfully connect the battery bank to the inverter. Please note that improper connections may lead to damaged equipment or hazardous situations, so it is crucial to follow these steps accurately.
Step 9: Connect the inverter to the electrical load
To connect the inverter to the electrical load, start by identifying the output terminals on the inverter. Connect the positive terminal to the positive terminal of the electrical load and the negative terminal to the negative terminal of the load. It is crucial to ensure the proper polarity, as reversing the connections can lead to damage. Follow the manufacturer’s instructions to ensure a safe and accurate connection.
Wrap up and Final Thoughts
In conclusion, connecting and wiring solar panels in an off-grid battery system requires careful consideration and adherence to proper procedures. Throughout this guide, we have highlighted the key steps involved in this process, emphasizing the significance of correctly wiring the solar panels and following the manufacturer’s instructions.
By ensuring that each solar panel is connected in series or parallel correctly, we can maximize the energy production and efficiency of the system. Additionally, proper wire sizing and connections are crucial for both safety and optimal performance.
It is important to remember that every manufacturer may have specific requirements and guidelines for their solar panels and batteries. This serves as a reminder that following these instructions is paramount to the success of the off-grid solar battery system.
We hope that this guide has provided you with the necessary knowledge and understanding to effectively connect and wire solar panels in an off-grid battery system. By implementing the proper wiring techniques and heeding the manufacturer’s instructions, you are well on your way to enjoying the benefits of reliable, renewable energy.