
In our step-by-step guide, “How to check the water quality produced by a solar-powered purification system,” we walk you through the process of ensuring that the water produced by your solar-powered purification system is safe and clean. This guide is designed to help you understand the importance of regular water quality checks and how to perform them effectively. By following our simple instructions, you can have confidence in the purity of the water you are drinking and using in your daily lives. So, let’s begin this journey towards cleaner and healthier water together.
Top-Rated Solar Water Purifiers for Clean Drinking Water


Setting up the solar-powered purification system
Ensure that the solar-powered purification system is properly installed and functional by following these steps:
- Begin by carefully reading and following the manufacturer’s instructions included with the system. These instructions will guide you through the installation process and provide any specific requirements or precautions.
- Select an appropriate location for the solar panels. They should be placed in an area that receives maximum sunlight throughout the day, ideally facing south. Ensure that there are no obstructions that could shade the panels.
- Install the solar panels securely using the mounting brackets provided. Ensure they are placed at the optimal angle for capturing sunlight.
- Connect the solar panels to the purification system according to the manufacturer’s instructions. This usually involves connecting the output of the panels to the input of the system. Make sure to use the correct cables or connectors as specified by the manufacturer.
- Verify that the purification system is properly connected to a reliable source of water. This may include attaching a pipe or hose from the system to a water source such as a well, borehole, or water storage tank.
- Once the system is installed and connected, carefully inspect all connections and ensure they are tight and secure. Check for any potential leaks or loose fittings and fix them immediately.
- Finally, turn on the solar-powered purification system according to the manufacturer’s instructions. This may involve activating a switch or setting a specific mode of operation.
By following these steps and carefully adhering to the manufacturer’s instructions, you can ensure that your solar-powered purification system is properly installed and functional, providing you with clean, purified water using renewable energy.

Collecting a water sample
To collect a water sample that has been purified by the solar-powered system, follow these steps:
- Prepare a clean and sterile container: Before collecting the sample, it is crucial to ensure that the container is free from any contaminants. Wash the container thoroughly with soap and warm water, rinsing it multiple times to remove any residue. To sterilize the container, either boil it for at least 10 minutes or use a sterilizing solution, following the manufacturer’s instructions.
- Choose an appropriate sampling point: Select a sampling point that represents the water quality from the solar-powered system accurately. Ideally, it should be a tap or faucet connected to the output of the system.
- Turn on the tap and let the water flow: Before collection, ensure that the water has been running for at least two minutes. This step helps eliminate any potential stagnant water or contaminants that may have accumulated in the pipes.
- Hold the container below the water stream: Keep the opening of the container below the water stream to collect the sample. Avoid touching the inside of the container or the cap to prevent contamination.
- Fill the container to the desired volume: Gradually fill the container, ensuring that you collect an adequate sample for your analysis or testing requirements. If there are specific volume requirements, measure the water as accurately as possible.
- Securely close the container: Once you have collected the desired volume, securely close the container to prevent any leakage or contamination during transportation.
Remember, maintaining cleanliness and avoiding contamination throughout the collection process is vital to ensure accurate and reliable results.

![Iron Test Strips, 0-100 ppm [Vial of 50 Strips] for Measuring Free Soluble Iron (Fe2+ and Fe3+)](https://m.media-amazon.com/images/I/21DNjRWVSHL.jpg)
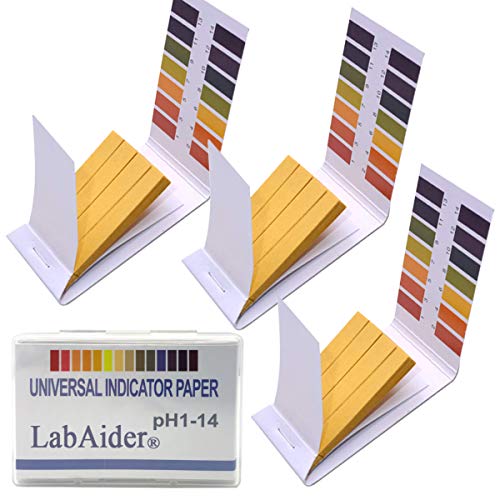
Testing for pH levels
To measure the pH level of a water sample, you will need a pH testing kit. Follow these steps for accurate results:
- Obtain a pH testing kit: Purchase a pH testing kit from your local store or online. Ensure that it is suitable for testing water pH levels.
- Prepare the water sample: Take a clean and clear container and fill it with the water you want to test. Avoid using containers that may affect the pH level, such as those made of metal or with traces of chemicals.
- Dip the pH testing strip: Open the pH testing kit and take out a pH testing strip. Dip the strip into the water sample for the recommended amount of time specified in the instructions.
- Remove the strip and wait: After the recommended time, gently remove the strip from the water and shake off any excess liquid.
- Observe the color change: Compare the color of the strip to the pH color chart provided in the kit. The color of the strip will correspond to a specific pH level.
- Determine the pH level: Match the color of the strip to the closest color on the pH color chart. This will indicate the pH level of the water sample.
- Interpret the result: If the pH level falls between 6.5 and 8.5, the water sample is within the ideal range for drinking water. If the pH level is below 6.5, the water sample is acidic, whereas if it is above 8.5, the water sample is alkaline.
By following these steps and using a pH testing kit, you can easily and accurately measure the pH level of your water sample.


![Nitrite 0-25 ppm, Nitrate 0-500 ppm Two Pad Test Strip [Vial of 50 Strips]](https://m.media-amazon.com/images/I/71fu2T9eJxL._SS520_.jpg)
Checking for turbidity
Turbidity refers to the cloudiness or haziness of water caused by suspended particles. To measure the turbidity of a water sample, you can use either a turbidity meter or a turbidity tube.
To measure turbidity using a turbidity meter, first, ensure that the meter is calibrated according to the manufacturer’s instructions. Then, fill the provided sample cell with the water sample, making sure to avoid any air bubbles. Insert the sample cell into the turbidity meter and wait for the reading to stabilize. The meter will display the turbidity measurement in NTU (Nephelometric Turbidity Units). It is recommended to aim for a turbidity level of less than 5 NTU, as suggested by the World Health Organization for drinking water.
Alternatively, you can use a turbidity tube to measure turbidity. Begin by filling the tube with the water sample until it is completely full. Then, place the turbidity tube on the turbidimeter and look through the tube. Gradually add distilled water into the tube until the black cross at the bottom of the tube is just visible. Note the level of the water in the tube as it corresponds to the turbidity value.
Remember that maintaining water clarity is essential for various applications, including drinking water. By using a turbidity meter or turbidity tube, you can effectively assess and monitor the turbidity of water to ensure it meets the recommended guidelines for clarity and safety.


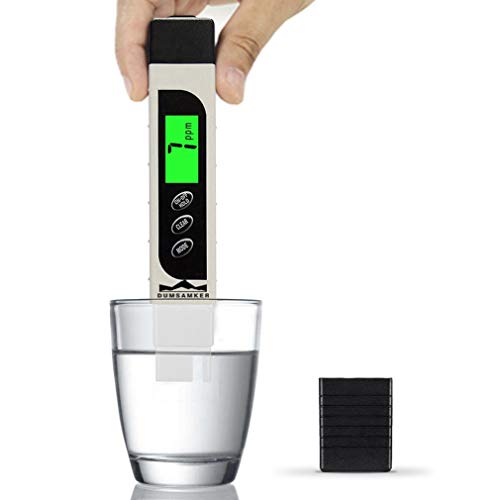
Testing for dissolved solids
To test for dissolved solids in drinking water, you will need a TDS (Total Dissolved Solids) meter. These meters measure the concentration of dissolved solids in a water sample, which can include minerals, salts, metals, and other substances.
To begin the testing process, make sure the TDS meter is calibrated according to the manufacturer’s instructions. Then, fill a clean container with the water sample you wish to test. Ensure that the container is large enough to submerge the TDS meter.
Next, turn on the TDS meter and place the probe into the water sample. Make sure the probe is fully submerged, but avoid touching the sides or bottom of the container. Give the meter a few seconds to stabilize and provide a reading.
Once the reading has stabilized, take note of the TDS value displayed on the meter. This value represents the concentration of dissolved solids in parts per million (ppm). Ideally, for drinking water, the TDS level should be below 500 ppm. If the reading exceeds this value, it may indicate a higher concentration of dissolved solids, which could affect the taste, odor, and safety of the water.
By regularly testing for dissolved solids in your drinking water, you can ensure its quality and make informed decisions about water treatment or filtration.


Analyzing for microbial contamination
To check for microbial contamination, use a water testing kit that includes tests for bacteria, viruses, and other microorganisms. Start by carefully reading and following the instructions provided with the kit. Begin with testing for bacteria by taking a water sample as directed. Make sure to use the appropriate container, sterilize it if necessary, and collect the sample in a clean and sanitary manner. Once you have the sample, add the required reagents or solutions as specified in the instructions. After mixing well, allow the solution to incubate for the recommended amount of time. Then, use the provided testing strips or plates to analyze the presence of bacterial growth. Compare the results to the included reference chart to determine the contamination level. Repeat this process for the tests related to viruses and other microorganisms, following the specific instructions and using the designated testing materials for each test. Remember to record and document your findings for future reference.
Evaluating the System’s Performance
In conclusion, regularly checking the water quality produced by a solar-powered purification system is crucial for ensuring safe and clean drinking water. Throughout this guide, we have discussed the steps involved in conducting these checks, emphasizing the significance of monitoring factors such as pH levels, turbidity, and presence of contaminants. By following these guidelines, we can confidently rely on solar-powered purification systems to deliver water that meets the highest quality standards. Regular monitoring not only guarantees the health and well-being of consumers but also helps in identifying any potential issues with the system early on. Remember, when it comes to drinking water, it is always better to be safe than sorry.
Necessary Equipment